1. Introduction
Hi folks ![]() , in this post I’m going to introduce a new project I’ve been working on recently: creating an operating system using Linux From Scratch (LFS). In this post, we’re going to go through why LFS, and get started on creating our own linux-based operating system from scratch.
, in this post I’m going to introduce a new project I’ve been working on recently: creating an operating system using Linux From Scratch (LFS). In this post, we’re going to go through why LFS, and get started on creating our own linux-based operating system from scratch.
1.1 What is LFS?
Linux From Scratch is a project that walks you through building your own customized linux system entirely from source, that was originally created by Gerard Beekmans [1]. There are now several versions of LFS, for various usages and architectures, including other projects to automate the entire process.
1.2 Why build this?
For a while now I’ve been wanting to learn more about operating systems, and more specifically how each of the individual components come together to make the full system. Running through LFS seemed like a great opportunity to do both that, and also build an operating system in the process.
1.3 What are we building?
We’ll be building a Linux From Scratch system for arm64 using this guide [2] that was originally published on December 4th 2023. More specifically, this is version arm64-r12.0-198
Please note: As this guide is for arm64, this won’t work for x86_64 systems, however there is a guide available for those here.
1.4 What will I be building this on?
I’ll be building this LFS system using parallels on macOS as the guide recommends not building it on your main day-to-day OS. To do this, I’ll be using Debian GNU Linux 12 ARM64.
2. Preparing the host system
2.1 Host system requirements
The LFS guide conveniently provides a shell script [3] to check the host system meets the requirements. I’ve created a gist that contains a copy here [4].
When I first ran this script, I ran into a few errors:
ERROR: Cannot find bison (Bison)
ERROR: Cannot find gawk (Gawk)
ERROR: Cannot find m4 (M4)
ERROR: Cannot find texizany (Texinfo)
ERROR: awk is NOT GNU
ERROR: yacc is NOT Bison
ERROR: sh is NOT Bash
For the first four errors, these were because the host system did not have them installed. This can be resolved by running:
sudo apt-get install {package-name}
Replacing {package-name} with the packages missing.
Re-running the verification script after this showed that the last remaining error was sh is NOT Bash.
We can resolve this by creating a symbolic link by using:
sudo ln -sf /bin/bash /bin/sh
2.2 Creating a new partition
For this project, we will need to create a new disk partition, as LFS will need to be installed on its own dedicated partition. As is mentioned in the guide [5], the minimum recommended size is around 10GB, however it’s recommended that you give create a partition with ~30GB of space as this will give you plenty of space to work with.
When I tried creating a new partition on-top of the debian VM, I ran into a few issues. The easiest way around these I found was to create a new disk for parallels to use with the VM, as this meant I could use the entire disk for the partition. To do this:
- Shut down your VM if you haven’t already done so.
- Open the settings menu for the VM.
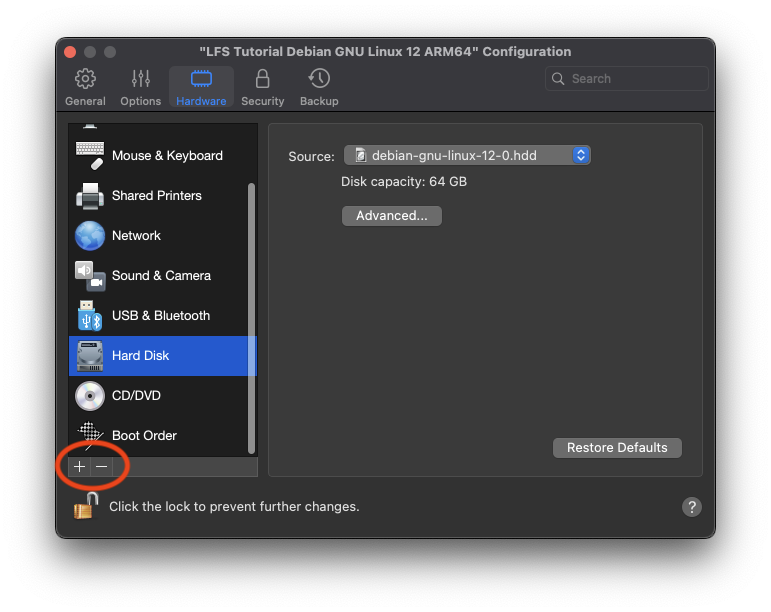
- Select the
+icon in the bottom left, and select hard disk
- Select the size of drive you would like to create.
- Start the parallels VM and sign in.
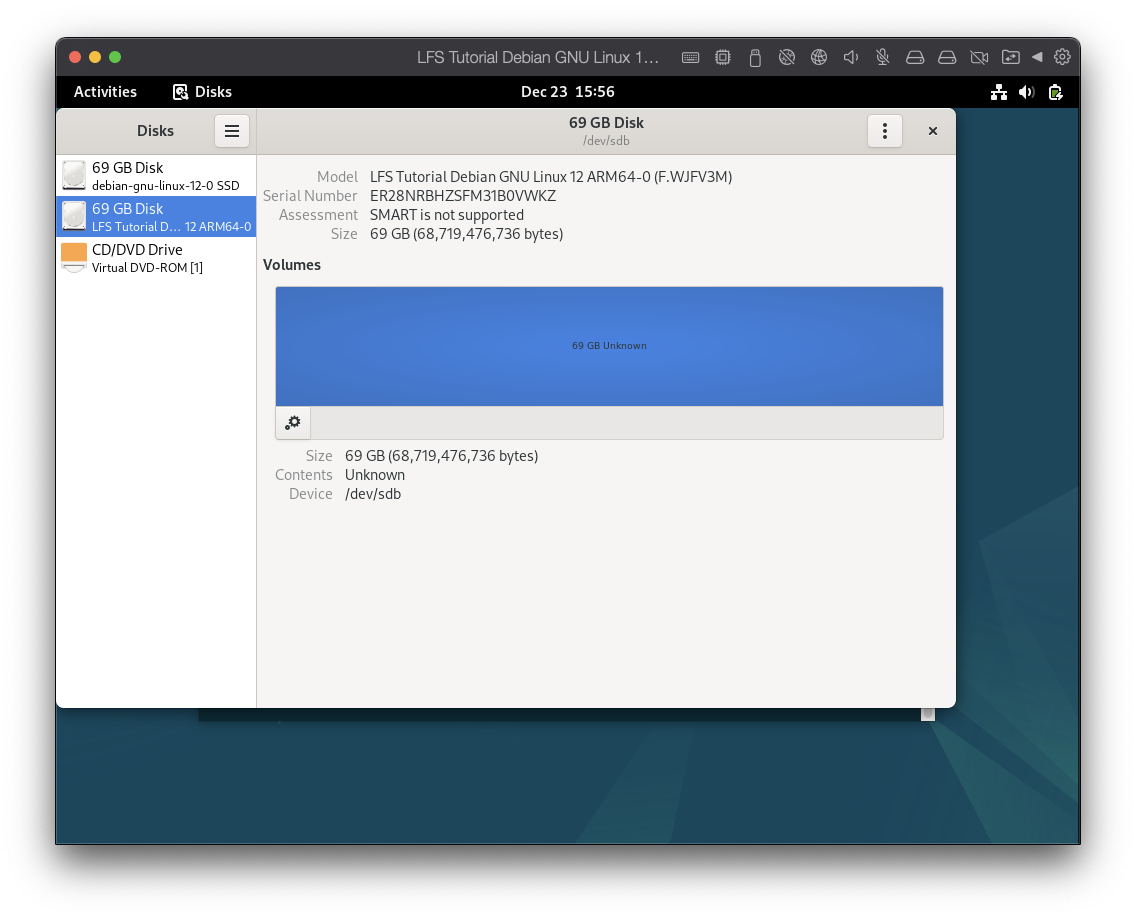
- Open the ‘disks’ application and select the new drive, the model name will match the name in parallels.
It will likely look like the below as it will not be formatted. Make a note of the device (/dev/sdbin this case).
- Open the terminal and run the following (replacing
/dev/sdbwith your device):sudo cfdisk /dev/sdb - Select a label (I selected gpt)
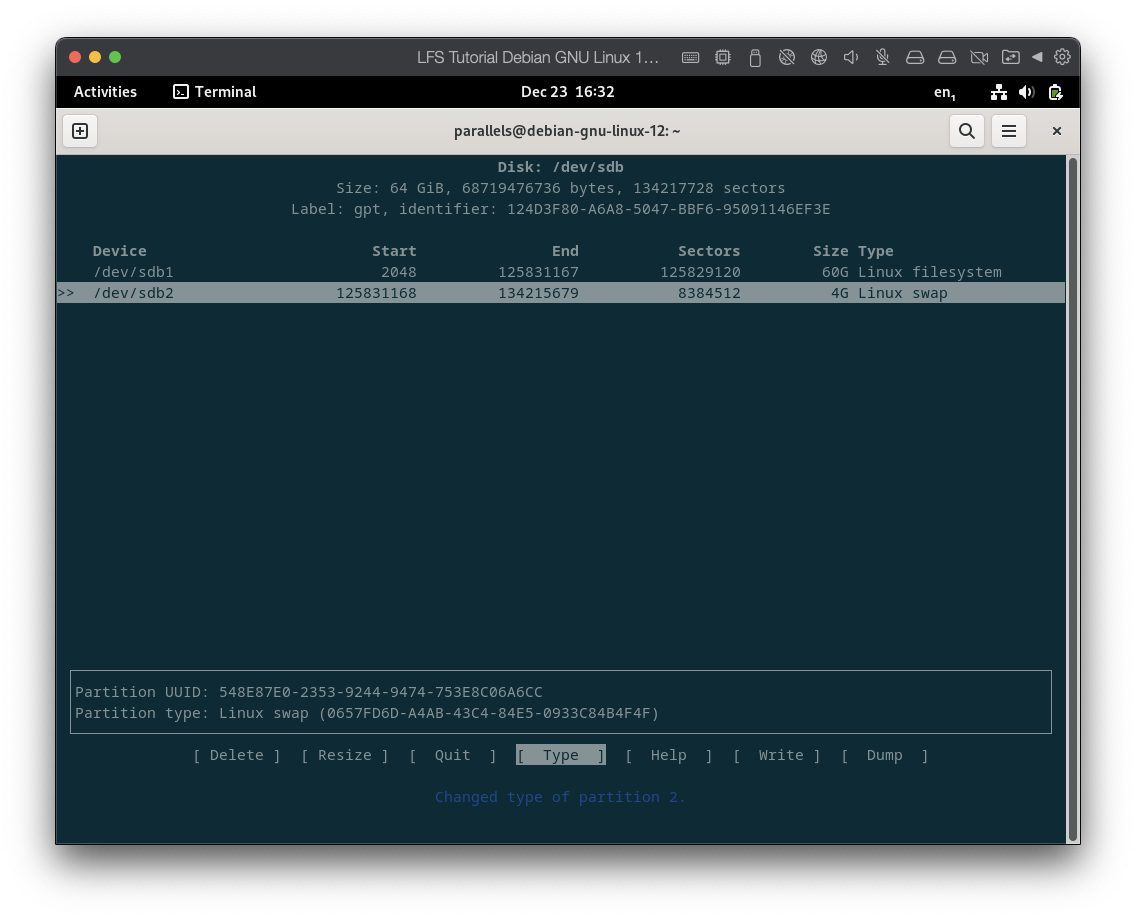
- Create a new partition by selecting the size and pressing enter. This will create your linux filesystem partition. For a 64GB drive, I selected 60GB for the linux filesystem partition, and 4GB for the swap partition.
- Select
Free spaceunderneath the partition you’ve just created, and press enter. - While having the new partition selected, move to
Typealong the bottom menu, and press enter. - Change the type to be
Linux swap.
By this point, cfdisk should look similar to the below screenshot

Update: When getting towards the end of the guide, if following the arm64 guide, you will also need an EFI partition.
This can be created here using cfdisk, and can be formatted the same way as the ext4 partition below, but using vfat in place of ext4.
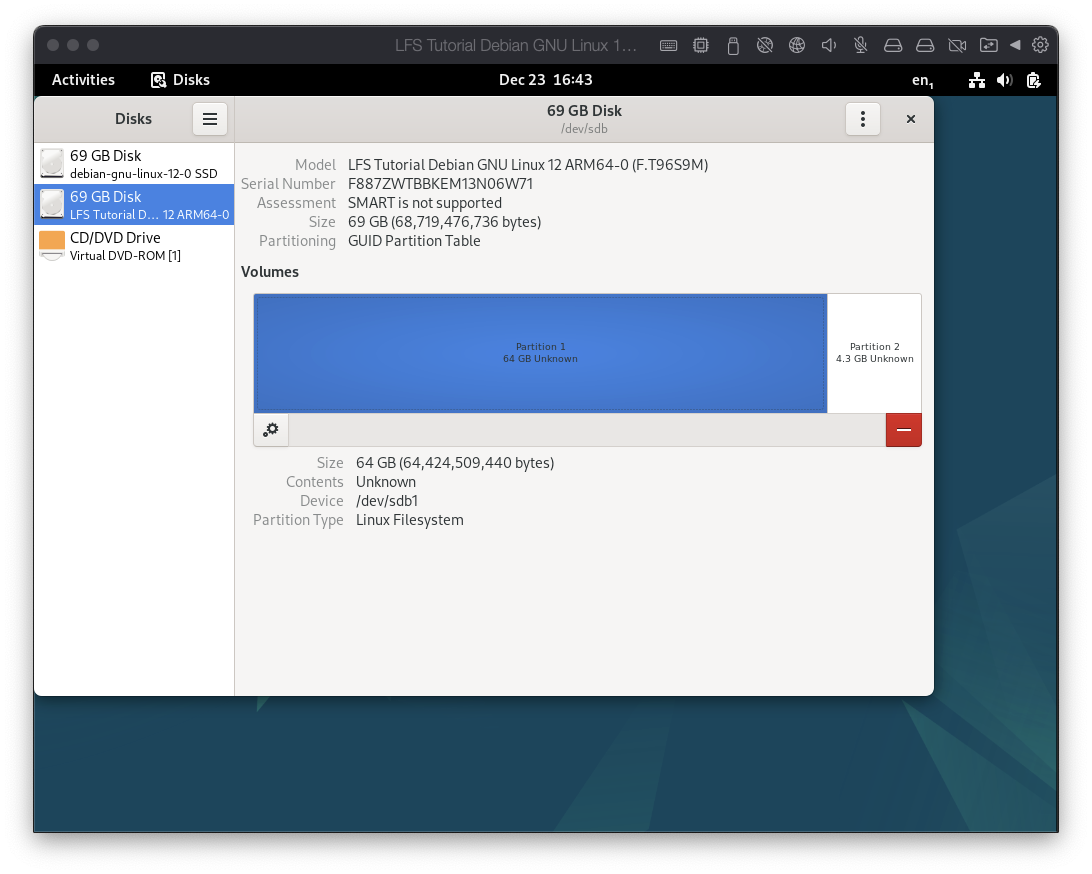
If we now exist cfdisk back to the ‘disks’ application, we can see the new partitions we have just created.

2.3 Initializing the filesystem on the new partitions
We also need to initialize the filesystem on the new partitions.
For this, I’ll be using ext4 for the main partition. This can be done by running:
sudo -v -t ext4 /dev/sdb1
We will also need to initialize the swap partition, which we can do by running:
sudo mkswap /dev/sdb2
2.4 Setting the LFS variable
The LFS variable is used heavily throughout the guide so will need to be set. It’s also worth checking that it is set regularly as if it’s not this will cause issues when installing packages later on.
To set the variable, you need to run:
export LFS=/mnt/lfs
To verify it was set, check that the output of this command outputs the directory you just set it to:
echo $LFS
2.5 Mounting the new partition
Please note The following commands assume that you don’t shut down the host system while running through the rest
of the project. If you are using parallels I’d recommend using the Suspend action as this will effectively ‘freeze’ the VM in its current state, and will allow you to close parallels.
With the filesystems created, we now need to mount the partitions [6], we can do this using the following commands.
sudo mkdir -pv $LFS
sudo mount -v -t ext4 /dev/sdb1 $LFS
The first of these commands will create a mount point using the $LFS variable that we just set, the second command will mount the LFS file system to the sdb1 partition.
As we are also using a swap partition, we will also need to run:
sudo /sdbin/swapon -v /dev/sdb2
2.6 Downloading the required packages
The next thing we need to do is to download the resources we will use to build the system. The first thing we need to do is create the sources directory as route, and give it permissions where even if the directory is writeable by multiple users, only the user who owns the file can delete them. These can be done by running:
sudo mkdir -v $LFS/sources
sudo chmod -v a+wt $LFS/sources
We then need to download the resources. We can do this by using wget and a file containing the required URLs.
I’ve created a copy of this from the revision of the guide used here [8].
The following command will download all of the resources into the $LFS/sources folder we created.
sudo wget --input-file=wget-list-sysv --continue --directory-prefix=$LFS/sources
If you downloaded these as a non-root user, you can change the owner to be root by running the following command:
chown root:root $LFS/sources/*
The guide also provides a copy of the expected md5 checksums for the packages. I’ve created a copy of this here [9]. These can be verified by running:
pushd $LFS/sources
  md5sum -c md5sums
popd
2.7 Creating a basic directory layout for the LFS system
As the last step before installing packages, we need to create some basic directories so we can install programs in their final directories. We can do this by running:
sudo mkdir -pv $LFS/{etc,var} $LFS/usr/{bin,lib,sbin}
The -p option will create any required parent directories, with the -v option enabling verbose mode.
We can also create symlinks between our LFS directories and our current user directories by running:
for i in bin lib sbin; do
  ln -sv usr/$i $LFS/$i
done
The -s option creates a symbolic link instead of a hard link, and the -v option is again for verbose mode.
We also need to create a ‘tools’ directory for the cross compiler that I will add more detail to in the next post. We can do this by running:
mkdir -pv $LFS/tools
2.8 Creating a new user and setting up the bash profile
By this point, we have all of the resources and structure we need to get started building our system. Theres just two last steps before we can get started,
- Creating a user for installing / building LFS
- Setting up the bash profile for the new user.
Creating a new user may sound like an odd choice here as we’ve ran a lot of commands as root, but there are good reasons to do so.
The first of which is that making a mistake when running a command as root can break the entire system you’re working on. Creating a
new lfs user can help to prevent this.
To create a new user, we can run the following:
sudo groupadd lfs
sudo useradd -s /bin/bash -g lfs -m -k /dev/null lfs
The guide discusses each of these options in more detail here [10].
It will also be worth setting a password for this user so you can change to the user from a non root user. To do this, run:
passwd lfs
and enter in the new password.
We can also make the new lfs user the owner of the directories we have just created by running:
sudo chown -v lfs $LFS/{usr{,/*},lib,var,etc,bin,sbin,tools}
Before we start the last step of setting up the profile for the new lfs user, we need to switch to them using:
su - lfs
2.9 Setting up the environment for the lfs user
The last step is setting up the new user and its bash profile [11].
This section of the guide is heavily detailed, explaining each part of the bash profile.
I’d recommend taking a good look through, and remember to set the make flags! When going through
this originally I forgot to for a while and wondered why builds were taking quite a while ![]() .
.
3. Conclusion
By this point, we’ve got the partitions created, the resources we need and the user set up and configured. We’ve got everything set up we need to start building our own linux system!
In the next post, we’ll keep going, starting with cross compilation. See you then ![]() .
.
References
[1] Linux from scratch homepage
[2] Linux from scratch for arm64
[3] Host requirements
[4] System Requirements version check script
[5] Creating a new partition
[6] Mounting the new partition
[7] Packages and patches introduction
[8] wget-list-sysv for LFS arm64-r12.0-198
[9] md5sums for LFS arm64-r12.0-198
[10] Adding the LFS user
[11] Setting up the environment for the LFS user
